Sunday, April 27, 2025

What 100% Grass-Fed Organic Dairy Brings to Your Table

728x90 Get Quote

It’s no secret that many grocery store dairy sections are filled with more options today. One choice continuing to gain favor with consumers is 100% grass-fed organic dairy. Nutrition, environmental awareness and animal care are some of the leading reasons consumers choose grass-fed dairy products.

Globally, the 100% grass-fed dairy market is projected to continue growing and some market experts predict annual growth rates as high as 22%. If you’re curious about 100% grass-fed organic dairy, consider these benefits from Maple Hill, America’s original 100% grass-fed organic dairy producer. The pioneer of 100% grass-fed organic dairy took its commitment a step further by celebrating and declaring National 100% Grass-Fed Organic Dairy Day on April 15, which recognizes the positive impact it has on consumers, cows, farmers and the environment.

1. Honoring the Farmers
Unlike large-scale corporate dairy farms, most organic farms are small, family-owned operations dedicated to traditional, sustainable farming. Small dairy farms have been disappearing, but 100% grass-fed organic dairy creates a sustainable, viable path forward for farmers who work in harmony with nature. 

This more natural approach to dairy is a “craft” process favoring small family farmers who are willing to dedicate the extra focus and patience to a better product and process. These family farms are passed on to future generations to grow the “better for you, better for the planet” approach.

2. Commitment to Good Health
Most consumers don’t know the difference between traditional organic and 100% grass-fed organic dairy. One key distinction is the products’ nutritional composition; 100% grass-fed organic dairy provides a 50% healthier ratio of omega 3:6 and 40% higher levels of CLA fatty acids, which may support heart health and provide other health benefits.

What’s more, Maple Hill’s products made with 100% grass-fed organic dairy are GMO free, hormone free and antibiotic free with no additives or fillers. The line of high-quality, rich-flavored products let you experience the organic difference from traditional dairy for a nutrient-dense solution that tastes as nature intended.

3. Happy, Healthy Cows
Cows on a 100% grass-fed diet can live up to three times as long as grain-fed cows and are never subjected to unnatural diets, hormones or antibiotics. More time in pastures filled with lush grass means cows have the freedom to roam, ruminate and graze on diverse, nutrient-rich grasses.

The result is happier, healthier cows, which in turn results in a richer, better-tasting and more nutrient-dense milk.

4. Sustainability and the Environment
Producing milk without grain or corn requires farmers to focus on regenerating soil and the soil life that supports everything else on the farm. In fact, the healthier the soil, the healthier the feed, so farmers have a natural incentive to be as regenerative as possible. Regenerative grazing practices are a powerful and positive tool to improve land and the web of life on farms by actively restoring soil health, promoting biodiversity and reducing the environmental impact compared to conventional dairy.

Well-managed grazing helps pull carbon from the atmosphere into the soil, fighting climate change in the process. In addition, healthier soil retains more water, reducing runoff and protecting water sources from agricultural pollution.

5. Strengthening the 100% Grass-Fed Organic Market
Consumers are increasingly aware of the choices they have in dairy products and how 100% grass-fed organic supports their health, farmers, animals and the planet. Some ways to support this category’s continued growth include choosing certified 100% grass-fed organic dairy, advocating for regenerative farming and helping shape a more sustainable food system.

Learn more about 100% grass-fed organic dairy products at maplehill.com.

SOURCE:

Maple Hill

728x90 Get Quote

Wednesday, April 16, 2025

Gear Up for Grilling Season

As the days get longer and the temperatures rise, it’s time to fire up the grill and elevate your outdoor cooking game. Whether you’re a seasoned grill master or just starting out, success comes down to three essentials: quality ingredients, the right seasonings and reliable equipment that gives you full control over heat and timing.

If you’re ready to turn up the heat this season, explore high-performance grilling solutions from Nexgrill – built to match every cooking style and skill level. From backyard barbecues to weeknight dinners under the open sky, its lineup is designed to help you serve up unforgettable flavors all season long. Visit nexgrill.com to learn more and get inspired.

Unlock a New Level of Outdoor Cooking Versatility

Transform your backyard into a chef-inspired kitchen with the Gourmet Pro 6-Burner Stainless Steel Gas Grill featuring the Griddle Max Cooking System. Designed to go beyond traditional grilling, this powerhouse lets you grill, saute, griddle and smoke all at once or on demand. The innovative system makes it easy to achieve restaurant-quality results, delivering unmatched versatility for any meal. Built with stainless steel burners, angled flame tamers and porcelain-coated cast-iron cooking grids, it ensures consistent heat and fewer flare-ups. With 811 square inches of cooking space, six main burners and a high-heat searing side burner, you’ll get 75,000 BTU of total cooking power.

Take on Breakfast, Lunch and Dinner

From sizzling fajitas at your backyard bash to early-morning pancakes before your next adventure, the Daytona 4-Burner Propane Gas Griddle delivers the heat, flavor and performance you need. Designed for versatility, this powerhouse features a 792-square-inch cooktop and four stainless steel burners, giving you the space and control to cook multiple dishes at once. Built-in convenience comes standard with dual side shelves, a lower storage rack to keep tools within reach and a removable grease cup for quick and easy cleanup. When it’s time to pack it in, a heavy-duty lid protects your cooking surface.

From Kitchen to Patio, It Goes Where You Go

Grilling isn’t just for the backyard. When weather or space keeps you inside, the Fuse 22-inch Electric Griddle delivers bold, flame-free cooking anywhere there’s an outlet. Ultralightweight and easy to transport, it’s built for seamless indoor-outdoor use. With 308 square inches of edge-to-edge heat, a durable nonstick surface and digital temperature control, this electric flattop offers precision and power. A hinged lid with a built-in viewing window locks in heat and flavor so you can cook efficiently. From weekday breakfasts in the kitchen to weekend feasts on the patio, it can be your all-access pass to delicious, flexible cooking – wherever life takes you.

SOURCE:
Nexgrill

Sunday, March 23, 2025

Street Tacos from the Slow Cooker

If your idea of street tacos includes standing over a hot skillet, wipe that sweat off your brow and give these Savory Street Tacos a try. They put the slow cooker and oven to work for you, providing that delicious street taco taste without the hassle. For more ways to simplify cooking at home, visit Culinary.net.

Savory Street Tacos

Recipe courtesy of “Cookin’ Savvy
Servings: 4-6

  • 1 chuck roast (2-3 pounds)
  • 1 package taco seasoning
  • 1 can (10 ounces) beef consommé
  • 16-20 street taco tortillas
  • 1 package (8 ounces) shredded cheese
  • 1/4 cup avocado oil
  • salsa, for serving
  • guacamole, for serving
  • queso, for serving
  1. Cover chuck roast with taco seasoning then place in slow cooker. Pour beef consommé over roast and cook on low 6 hours to braise.
  2. Heat oven to 425 F.
  3. Use fork to shred roast.
  4. Brush outside of tortillas with avocado oil and fill with meat and shredded cheese. Place in casserole dish and bake 10-15 minutes until tacos reach desired crispiness.
  5. Place on tray and serve with salsa, guacamole and queso.

Tip: Recipe can be doubled for large crowds.

SOURCE:
Culinary.net

Sunday, March 9, 2025

Make Your St. Patrick's Day Spread Green with Envy

Freshen up your St. Patrick’s Day menu with easy, light sandwiches inspired by the traditional color of the festivities. These open-faced noshes can be perfect for lunch, snack time or even as an appetizer for get-togethers with friends and family.

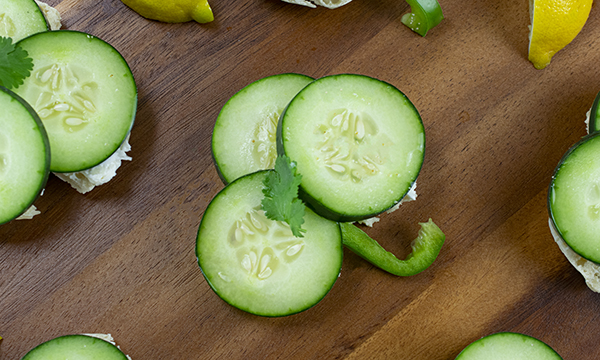
Layered with a smooth cream cheese and mozzarella mixture then topped with crisp cucumber and a stem of green bell pepper, these St. Patrick’s Day Sandwiches are easy and cute, which makes them a fan favorite at nearly any green gathering. They’re also sprinkled with lemon juice to add a little acidity and create a nice, light bite.

Plus, this recipe is quick to make. When you’re in a rush to get everything on the table for the party, it’s easy to throw together and get on the platter in next to no time.

The sandwiches pop off the plate with their bright, seasonal garnishes. While sure to attract attention and have your loved ones asking “Where did you get this idea?” they’re also an easy way to sneak a few vegetables into your kids’ diets.

For more festive recipes and ideas at Culinary.net.

Watch video to see how to make this recipe!

St. Patrick’s Day Sandwiches

Yield: 8 sandwiches

  • 8          ounces plain cream cheese spread, softened
  • 1          cup finely shredded mozzarella cheese
  • salt
  • 4          English muffins
  • 24        slices cucumber
  • 8          thin slices green pepper
  • fresh cilantro leaves
  • lemon juice
  • lemon slices, for garnish (optional)
  1. In bowl, mix cream cheese spread, mozzarella cheese and salt well.
  2. Split English muffins in half. Cut each muffin half into shamrock shape.
  3. Spread cheese mixture over each muffin half.
  4. Place three cucumbers on each “shamrock,” one on each “leaf.” Use green pepper slice as stem. Place cilantro leaf on top of each sandwich.
  5. Sprinkle sandwiches with lemon juice and add lemon slices, for garnish, if desired.
SOURCE:
Culinary

Sunday, February 9, 2025

A Game Day Checklist: Ensure you're ready with tailgating essentials

Preparing for game day means gathering the right gear to ensure the pregame parking lot festivities are as exciting as the game that follows.

Elevate your game-day experience with this ultimate guide of essential tailgating gear to keep your squad happy no matter the score at the end of the day.

Comfort and Convenience Items
Comfort is key for a long day of tailgating, so be sure to bring the right gear to keep everyone safe and comfortable, including:

  • Folding chairs and tables
  • Pop-up tent or canopy
  • Blankets
  • Portable heater
  • Sunscreen
  • Insect repellant
  • First aid kit
  • Tool set
  • Hand-washing station or hand sanitizer
  • Trash bags


Cooking and Grilling Equipment
No tailgate is complete without a feast, and to cook up a storm, you’ll need the right equipment, such as:

  • Portable grill, smoker or griddle
  • Propane or charcoal
  • Lighter and lighter fluid
  • Grilling tools (tongs, spatula, grill brush)
  • Meat thermometer
  • Cooler with ice
  • Disposable tableware, cups and utensils
  • Storage containers
  • Aluminum foil

Food and Beverages
A successful tailgate is powered by delicious food and refreshing beverages. Stock up on crowd-pleasers like these:

  • Burgers
  • Sausages or hot dogs
  • Ribs
  • Wings
  • Veggie burgers
  • Coleslaw
  • Potato salad
  • Chips
  • Dips
  • Nuts
  • Pretzels
  • Sandwiches or wraps
  • Condiments, including ketchup, mustard, mayo and relish
  • Cookies
  • Brownies
  • Fruit skewers
  • Water
  • Soda
  • Sports drinks
  • Beer
  • Wine

Games and Entertainment
While the game is the main event, tailgate games are a staple for pregame festivities. Consider bringing options such as:

  • Cornhole
  • Ladder toss
  • Horseshoes
  • Football
  • Frisbee
  • Portable Bluetooth speaker
  • Portable TV or projector
  • Portable generator
  • Coloring books and crayons
  • Small children’s toys

Find more tips and ideas to make your tailgate a hit at eLivingtoday.com.

SOURCE:
eLivingtoday.com

Sunday, January 5, 2025

The Ultimate Guide to Game Day Hosting: 6 tips to host a game day gathering like a pro

From kickoff to the final whistle, game day is all about spending time with friends and family while rooting for your favorite team. When it’s your turn to host, you can bring all the fun of a tailgate party to the comfort of your couch with the proper plan for hosting.

Show Your Team Spirit
Make your guests feel excited from the moment they walk through the door – or as soon as they pull in the driveway – by decking out your space in team colors and memorabilia. Use football- or team-themed banners, flags, balloons, coasters and tablecloths to set the mood.

Wear your favorite jersey and create a stadium-like atmosphere with fun props like foam fingers or pom-poms for guests to use and cheer on their team.

Prep Ahead of Time to Score Big
Avoid a rush before kickoff by making a checklist of everything you’ll need. Ensure your TV and sound systems are working correctly and that you have access to the right channel or streaming platform.

Make a store run at least a day in advance to grab everything you’ll need for your watch party: dishes, snacks, drinks, tablecloths, trash bags and some household essentials like Finish Ultimate Dishwasher Detergent. Finish Ultimate tackles dish cleanup in the kitchen like a pro, so hosts can enjoy all the fun parts of game day without the worry.

If possible, pack your coolers the night before – just as you would for tailgating at the stadium – and prep and cook any dishes you can ahead of time, so you can enjoy the action with minimal interruptions.

Feed the Fans
Football fans are often foodies, too. A buffet-style food setup allows guests to help themselves to their favorite snacks and dishes throughout all four quarters.

Review your game plan ahead of kickoff to make sure your game day menu offers a variety of finger foods, such as wings, sliders and nachos. Then, take your menu to the next level with unique eats like this new saucy, cheesy creation – the TRUFF Hot Honey Bacon Cheddar Dip with Pretzel Bites – to add a spicy twist.

To complete the roster of game day eats, include a veggie tray or charcuterie board and a variety of beverages, including water, soda and juice. To stay on theme, consider serving cake or brownies in the shape of a football for dessert or topping cupcakes with icing in the team’s colors.

Tackle Cleanup
All those delicious snacks your guests are enjoying are sure to make a mess. For hosts tackling cleanup during the game, don’t miss out on all the on-screen action–turn to the star player to make cleanup a breeze: Finish Ultimate Dishwasher Detergent.

Finish Ultimate tackles tough game day messes, even without pre-rinsing, leaving hosts more time to cheer on their team and less time in the kitchen cleaning up.

Create the Perfect Viewing Environment
Ensure everyone has an unobstructed view by arranging your seating strategically. Use a combination of couches, chairs and floor cushions to accommodate your guests. Scatter small tables throughout the area within easy reach for guests to place their drinks and snacks while the action is live.

To ensure fans never miss a moment of the action, turn the TVs in other rooms to the game as well; just ensure the sound is down in case the main screen is ahead or behind of the secondary viewing options.

Consider Downtime Entertainment to Keep the Energy High
While the main event is watching the action, you can keep the excitement going during halftime and commercial breaks with fun activities like cornhole, football trivia, bingo, mascot matching or an old-fashioned game of catch. Also have some board games, card games or video games on hand for those who might want to take a break from watching or children who aren’t as engaged in the on-screen action.

For the ultimate game day recipe and to find more ways to tackle dish cleanup in the kitchen on game day, visit finishdishwashing.com/truff-hot-honey-bacon-cheddar-dip.

Hot Honey Bacon Cheddar Dip with Pretzel Bites

Recipe courtesy of Finish
Prep time: 15 minutes
Cook time: 1 hour
Servings: 12

  • 5          slices bacon
  • 1/2       cup honey
  • 2          tablespoons TRUFF Original Hot Sauce
  • 16        ounces cream cheese, softened
  • 2/3       cup lager-style beer
  • 1/4       cup Dijon mustard
  • 24        ounces cheddar cheese, grated
  • 1/2       cup fresh scallions, chopped
  • 1          teaspoon garlic powder
  • 1          teaspoon onion powder
  • 1/2       teaspoon cracked black pepper
  • 24        ounces frozen pretzel bites, baked according to package instructions
  1. Preheat oven to 400° F.
  2. Evenly space bacon in 13-by-9-inch dishwasher-safe ceramic or glass baking dish.
  3. Bake bacon 10 minutes.
  4. Microwave honey 15-20 seconds. Add hot sauce and whisk to combine.
  5. Remove bacon from oven and carefully pat dry with paper towels.
  6. Brush bacon with hot honey and return to oven. Set aside any remaining hot honey for later use.
  7. Bake bacon 10-15 minutes until brown and crisp. Set bacon aside to cool.
  8. Chop bacon into small, bite-sized pieces.
  9. Pour bacon pan drippings into bowl and discard once cool.
  10. In bowl, whisk softened cream cheese, beer and mustard to combine.
  11. Add grated cheddar cheese, chopped scallions, garlic powder, onion powder and black pepper. Stir until thoroughly combined.
  12. Spread mixture evenly in 13-by-9-inch dishwasher-safe ceramic or glass baking dish.
  13. Bake 20-25 minutes, or until hot and bubbly.
  14. Remove from oven and rest 5 minutes.
  15. Sprinkle top of dip with chopped bacon and drizzle with remaining hot honey.
  16. Serve dip alongside baked pretzel bites.
SOURCE:
Finish

Saturday, January 4, 2025

Convenient Breakfasts to Kickstart the New Year

Starting the morning on the right foot can set the tone for a productive day. Even when crunched for time before work or school, eating a filling breakfast before heading out the door is an important part of setting yourself up for success.

Between work, kids and making it to that early morning workout session, finding time to prepare a quick and tasty meal can be a real challenge. For a flavorful and easy breakfast that can be on the table in just 8 minutes when you’re in a rush, try this Quick Breakfast Skillet. With crispy bacon, scrambled eggs and rich cheddar cheese, it’s a perfect way to fuel your morning.

The secret, convenient ingredient: fluffy Minute Butter & Sea Salt Jasmine Rice Cups. Ready in just 60 seconds to fit into the day with no hassle, this versatile and flavorful ingredient is perfectly portioned in a BPA-free cup and features a delicious blend of familiar flavors to liven up breakfast.

Or try something new and delicious with this One-Pot Rice Shakshuka. A dish with origins in the Middle East and Northern Africa, shakshuka is traditionally made with a base of tomatoes, vegetables and seasonings, such as cumin and paprika. Then eggs are cracked on top and cooked in the sauce.

This version takes it a step further with the addition of Minute Instant White Rice, which provides a heartier texture to keep you feeling satisfied longer. Simply precooked and dried – nothing added but convenience – you can enjoy its light, fluffy texture after just 5 minutes in the microwave or on the stove. Plus, it works for those with dietary restrictions, including gluten-free, vegan or vegetarian.

Find more breakfast inspiration to keep you energized and ready to conquer the day at minuterice.com.

Quick Breakfast Skillet

Prep time: 2 minutes
Cook time: 6 minutes
Servings: 1

  1. Heat rice according to package directions.
  2. Heat medium frying pan over medium heat and add bacon. Cook about 4 minutes, or to desired doneness.
  3. Scramble egg and add to frying pan. Cook 1 minute, or to desired doneness.
  4. In bowl, mix rice, egg and bacon mixture and cheese. Top with cracked black pepper.
Tips: Breakfast sausage or breakfast potatoes can be substituted for bacon. Add favorite hot sauce for a little heat.


One-Pot Rice Shakshuka

Prep time: 10 minutes
Cook time: 25 minutes
Servings: 6

  • 2          tablespoons olive oil
  • 1          onion, diced
  • 1          red bell pepper, seeded and diced
  • 1          teaspoon ground cumin
  • 1/2       teaspoon smoked paprika
  • 1          can (28 ounces) diced tomatoes with garlic and herbs
  • 2          cups water
  • 1 1/2    cups Minute Instant White Rice
  • 6          eggs
  • 1          tablespoon finely chopped fresh parsley
  1. Heat oven to 400 F.
  2. In high-sided, ovenproof skillet over medium heat, heat oil. Add onion, bell pepper, cumin and smoked paprika; saute 8-10 minutes until vegetables are tender.
  3. Add tomatoes and water to skillet. Bring to boil. Stir in rice and reduce heat to low. Cover and cook 3-5 minutes, or until most water is absorbed.
  4. Using spoon, create six small wells in rice mixture. Crack one egg into each well. Transfer skillet to oven; cook 12-15 minutes, or until rice is tender, egg whites are set and yolks are runny, or until cooked as desired.
  5. Garnish shakshuka with parsley before serving.

Tip: For spicy eggs, stir 1 tablespoon harissa paste into rice mixture before adding eggs. Or serve shakshuka with hot sauce.

SOURCE:
Minute Rice

Wednesday, August 14, 2024

Crispy Grilled Chicken with a Kick

Those first school bells may be ringing, but they don’t have to signal the end of grilling season. This Blackened Spatchcock Chicken keeps the meat moist, tender and tasty with crispy skin and a spicy seasoning to keep your summer spirit alive. Visit Culinary.net to find more recipes that keep your grill lit all year long.

Blackened Spatchcock Chicken

  • 1 whole chicken
  • 1 cup melted butter or ghee
  • 2 tablespoons heat-and-sweet seasoning
  • 1/2 tablespoon garlic powder
  • salt, to taste
  • pepper, to taste
  1. Heat grill to 375-400 F.
  2. Use kitchen shears or knife to remove backbone from chicken to lay flat. Remove rib cage, if desired, or push flat with hands.
  3. Mix butter, heat-and-sweet seasoning and garlic powder. Using meat injector, inject mixture into chicken. Rub remaining buttered seasoning over chicken and season with salt and pepper, to taste.
  4. Place spatchcock chicken breast-side up over indirect heat and cook 35-40 minutes.
  5. When internal temperature reaches 145 F, flip chicken breast-side down over direct heat 5 minutes, or until internal temperature reaches 165 F.
  6. Let rest 10 minutes before serving.


SOURCE:
Culinary.net

Saturday, July 13, 2024

Shake Up Family Meals with a Versatile Superfood: 5 benefits of cooking with ghee

It’s easy to fall into a dinnertime rut, cooking the same meals with the same ingredients time and again. When your family is in search of a delicious way to shake things up in the kitchen, consider new ways to cook favorite dishes without completely rethinking the menu.

Replacing tired ingredients is an easy solution when classic recipes become bland and boring, which is a perfect reason to try cooking with 4th & Heart Ghee. As a 1:1 substitute for butter or oil, its spreadable texture makes it easy to use in baked goods, grilled dishes and beyond.

This superfood can do all the things butter can do – like make toast taste awesome and trick your kids into eating broccoli – but with additional benefits. For example, it maintains its molecular integrity at high temperatures, can be digested by lactose intolerant people, supports weight loss, improves digestion and reduces inflammation.

Consider these benefits of choosing 4th & Heart Ghee instead of butter:

  • Grass-fed and pasture-raised: It’s packed with naturally occurring fatty acids and CLA, which can improve gut health and biochemistry.
  • Spreadable and shelf-stable: Ghee is shelf-stable for up to 12 months and is best kept in the pantry. This means you never have to scramble to bring butter to room temperature quickly when baking or risk mangling your toast with cold butter.
  • High smoke point: When oil smokes, it becomes a trans fatty acid. With a smoke point of 485 F, ghee lets you cook away without worrying about high temperatures.
  • Natural source of butyric acid: Butyric acid naturally occurs in your gut and in ghee, helping your body absorb nutrients from the foods you eat.
  • Buttery taste: Ghee made in the traditional style provides a delicious, light and buttery taste, perfect for this Sweet Potato Bowl with Cilantro, Turmeric Ghee and Lime. It’s ideal for a light lunch or dinner as it’s bursting with vibrant flavors and wholesome ingredients.
To find more benefits of cooking with ghee, along with recipe inspiration, visit fourthandheart.com.

Sweet Potato Bowl with Cilantro, Turmeric Ghee and Lime

  • 2 large sweet potatoes, peeled and cubed
  • 2 tablespoons 4th & Heart Turmeric Ghee, divided
  • 1 teaspoon cumin powder
  • 1 teaspoon smoked paprika
  • salt, to taste
  • pepper, to taste
  • 1 cup quinoa
  • 1 can black beans, drained and rinsed
  • 1/4 cup red onion, finely diced
  • 1/4 cup fresh cilantro, chopped, plus additional for garnish, divided
  • 1 lime, juice only
  • 1/4 cup crumbled feta or goat cheese (optional)
  1. Preheat oven to 400 F.
  2. In large bowl, toss cubed sweet potatoes with 1 tablespoon turmeric ghee, cumin powder and smoked paprika; add salt and pepper, to taste. Spread sweet potatoes evenly on baking sheet and roast 25-30 minutes, or until tender and slightly crispy on edges, turning halfway through.
  3. Cook quinoa according to package instructions. Once cooked, fluff with fork and set aside.
  4. In medium bowl, mix cooked quinoa with black beans, red onion and 1/4 cup chopped cilantro.
  5. Drizzle half the lime juice over quinoa mixture and stir to combine. Add salt and pepper, to taste.
  6. In large serving bowl, top quinoa mixture with roasted sweet potatoes. Drizzle remaining turmeric ghee over bowl. Squeeze remaining lime juice over top. Garnish with additional chopped cilantro and crumbled feta or goat cheese, if desired.
SOURCE:
4th & Heart Ghee

Wednesday, July 3, 2024

Give Your Grilling Game a Flavor Boost: 3 tips to make summer meals deliciously memorable

Make sure your grill game is on fire this summer. The right prepping, seasoning and grilling techniques can help you serve your favorite foods in the tastiest ways all summer.

Consider these helpful tips from the flavor experts at Watkins.

Seasoning with Staying Power
The first step for impressive flavor is proper preparation. For dry seasoning, blot meat or sliced vegetables (such as zucchini) with paper towels to dry. Then rub 1-2 teaspoons of vegetable oil over each piece to help your seasoning or dry rub stick.

For marinades, after mixing – but before adding the meat – reserve 2 tablespoons of marinade liquid to baste meat while on the grill. If you’re dicing meat (except for shrimp), do so before adding it to the marinade so each piece can soak in as much flavor as possible.

Finally, no grilling menu would be complete without burgers. Adding a seasoning tailor-made for this all-American classic, like Watkins Organic Hamburger Seasoning, brings an unforgettable boost of flavor. You’ll want about 1 tablespoon of seasoning for each pound of ground meat – just be sure to mix in thoroughly before you make your patties to distribute the flavor evenly.

Flavor for All Your Favorites
While most people think of meats for grilling season, there are so many ways to spice up all your favorite foods and beverages. For fajitas, you can use chili lime seasoning for the meat and put it on the rim of your lemonade or margaritas, too.

You can also switch it up and roast potatoes instead of fries to go with a well-seasoned burger. Try peppercorn Parmesan seasoning for a complementary flavor. If you’re looking for a finishing touch for steak, mushrooms make a perfect enhancement and you can use the same steak seasoning to prepare them.

A Showstopping Side
Grilled corn makes a fresh, juicy side for summer meals. For tender kernels and a milder char flavor, leave the husks on, soak the corn in water for 20-30 minutes and grill over medium-high heat for 15-20 minutes. For more char and caramelized flavor, remove the husks and grill over medium-high heat for 8-10 minutes, turning frequently.

After grilling, remove the husks (if needed) and lightly coat the corn in butter before seasoning. Corn can work with a range of flavor profiles – get creative with Watkins Organic Mesquite, Chili Lime or Peppercorn Parmesan seasoning blends to make your most memorable corn yet.

Whatever you add to your menu, enjoy finding new summer staples. For more flavors and grilling inspiration, visit watkins1868.com.

Southwest Pork Chops

  1. Combine chili lime seasoning, black pepper, cooking oil and pink salt. Spread mixture evenly over pork chops. Cover and refrigerate at least 30 minutes.
  2. Heat grill to medium heat. Grill pork chops 4-5 inches from heat source, turning frequently, until no longer pink when cut near bone. Serve with hot sauce, if desired.

Peppery Beef Kebabs

  1. Sprinkle sirloin with steak seasoning and black pepper. Thread beef onto skewers along with bell peppers, onions and mushrooms, as desired.
  2. Heat grill to medium-high heat. Grill, turning occasionally, until meat is cooked to desired doneness, 5-7 minutes. Serve atop cooked couscous or rice.
SOURCE:
Watkins Spices

Friday, June 28, 2024

Celebrate Salad Season Outside the Bowl

Elevate mealtimes with Caesar salad-inspired dishes

From putting a family meal on the table after activities to hosting a large crowd at your next get-together, a seasonal favorite like Caesar salad can serve as the perfect canvas for creating quick, easy-to-prepare meals.

With more than 100 varieties of fresh, healthy and convenient ready-to-eat salads – including 11 Caesar salad varieties like the Caesar Chopped Salad Kit – Fresh Express provides tasty, versatile salad kits that can be modified to fit nearly any kind of meal you might be craving.

Available in the refrigerated produce department, these premium mixes can be eaten as a standalone salad when time is of the essence or taken beyond the bowl and fused with another beloved classic, like tacos, for a burst of flavor and texture in every bite. These Fried Chicken Caesar Tacos, ready in just 30 minutes, feature savory Caesar salad – crisp, chopped romaine; herb-seasoned crouton crumbles; cracked pepper; grated Parmesan cheese; and a delicious Parmesan Caesar dressing – enveloped in a crispy, golden chicken shell.

Even when time is limited, flavor doesn’t need to be compromised. Inspired by high-end dining experiences, the Fresh Express Twisted Creamy Truffle Caesar Chopped Salad Kit provides a gourmet twist to turn these Creamy Truffle Caesar Pork Sandwiches into a culinary delight. Ready is just 20 minutes and featuring tender pork strips; a Caesar salad mix of garden-fresh crispy romaine lettuce, delicate sprinkles of truffle Parmesan cheese, crunchy garlic brioche croutons and creamy dressing; and sauteed onions on a toasted bun, every bite is a sensation to be savored.

To find more inspiration for elevating your salads or locate a store near you, visit freshexpress.com.

Creamy Truffle Caesar Pork Sandwiches

Prep time: 5 minutes 
Cook time: 15 minutes 
Servings: 4

  1. Preheat pan on stove over medium-high heat. Season pork chops with Italian seasoning.
  2. When pan is hot, add oil and pork chops. Cook pork chops, turning halfway through, until they reach minimum internal temperature of 145 F, 6-8 minutes per side (depending on thickness).
  3. Once pork chops are cooked through, remove from pan and let rest a few minutes.
  4. Peel and slice onion. After resting, slice pork into strips; set aside.
  5. In same pan, saute onion until translucent, about 5 minutes. Set aside.
  6. In large bowl, combine lettuce, dressing, croutons and cheese from salad kit.
  7. In separate pan, toast buns until golden brown; set aside.
  8. To build sandwiches, place sliced pork on bottom halves of toasted buns. Top with prepared salad mixture and sauteed onions. Finish with top halves of buns.

Chicken Caesar Tacos

Prep time: 10 minutes
Cook time: 20 minutes
Servings: 4

  1. In shallow bowl, beat eggs. In separate bowl, combine flour and half packet of taco seasoning.
  2. Place chicken in resealable bag and, using meat tenderizer, pound to 1/4-inch thickness.
  3. In medium saute pan, heat oil over medium heat.
  4. Season chicken breasts with remaining taco seasoning.
  5. Coat chicken in flour mixture, dip into beaten eggs then coat chicken in flour mixture again, pressing firmly to adhere.
  6. In pan with hot oil, cook battered chicken until golden brown, flipping halfway through, until chicken reaches minimum internal temperature of 165 F, 4-5 minutes per side (depending on thickness). Fry in batches to avoid overcrowding pan, if necessary.
  7. Once fully cooked, fold chicken over to create taco shell-shape. Place sheet pan on top to hold shape, 3-4 minutes.
  8. In large bowl, combine lettuce, dressing, croutons and cheese from salad kit.
  9. Once chicken taco shells set, carefully remove sheet pan. Fill each taco shell with prepared salad mixture.


SOURCE:
Fresh Expres

Sunday, June 16, 2024

Quench Your Summer Cravings with Bold, Refreshing Beverages

In between summer adventures and hot afternoons spent poolside, you’re likely looking to combat rising temperatures with a cool, refreshing beverage. This year, quench your thirst with drinks that play up the trendiness of bold flavors.

While many concoctions can help you beat the heat, some gems seem to hit the spot better than others. Consider one of the trendiest beverages that is increasingly becoming available at smoothie and juice bars nationwide but which you can also prepare at home: the tempting, bold taste of the Mangonada. With a harmonious fusion of sweet, spicy and tangy flavors, this thirst-quencher captures the essence of tropical indulgence with the majestic mango at the center of its symphony of flavors.

“Mango not only adds a burst of flavor but also brings a unique depth to the beverage,” said Dan Spellman, director of marketing for the National Mango Board.

Central to the Mangonada is Tajín Fruity Chamoy Sauce and Clásico Seasoning – a zesty blend of chili peppers, lime and sea salt – which are must-have ingredients to make the beverage. They combine to infuse the drink with a subtle kick, balancing the mango’s sweetness with a hint of spiciness that hits different.

This beloved beverage has captured the hearts and palates of people worldwide with its bold flavors and vibrant spirit to make summer deliciously unforgettable.

For another take on a classic drink, give this Tangy Chamoy Tropical Daiquiri a try at your next summer cookout. You can enjoy its cool, refreshing flavor with just the right touch of spice from Tajín Fruity Chamoy Hot Sauce with the yellow cap, which is made with natural ingredients but offers a unique fruity and tangy flavor, ideal for pairing with sweet snacks like fruits, smoothies, mangonadas and ice pops. With no added sugar or coloring, they’re perfect for the entire family all summer long.

There are thousands of ways to enjoy these unique flavors. To find more refreshing drinks that beat the summer heat, visit tajin.com.

Mangonada

Recipe courtesy of the National Mango Board

  • 1 cup fresh mango cubes, plus 5-6 cubes for garnish, divided
  • 2 ounces fresh mango nectar
  • 1/2 ounce lime juice
  • 2 cups ice
  • 1/2 ounce agave nectar
  • 2 tablespoons Tajín Fruity Chamoy Hot Sauce, plus 2 ounces for garnish, divided
  • 1 tablespoon Tajín Clásico Seasoning, for garnish
  • 1 tamarind candy, for garnish (optional)
  1. Measure 1 cup mango cubes, mango nectar, lime juice, ice and agave nectar into blender cup. Blend until smooth.
  2. In separate small dishes, add 1 ounce hot sauce and 1 ounce seasoning.
  3. Dip rim of 14-ounce Collins glass into hot sauce then seasoning to coat. Drizzle remaining hot sauce along inside of glass.
  4. In glass, pour 1 tablespoon chamoy sauce followed by blended Mangonada. Top with remaining fresh mango cubes and sprinkle with additional seasoning. Add tamarind candy to glass, if desired.

Tangy Chamoy Tropical Daiquiri

Total time: 15 minutes
Servings: 2

To Rim Glass:

Drink:

  1. Rim two glasses in hot sauce then in seasoning.
  2. Blend diced pineapple with orange juice, ice and hot sauce; pour into glasses.
  3. Garnish with pineapple slice.
SOURCE:
Tajin